EZ-PULLER EP-12045 SET UP INSTRUCTIONS
1. Centre the tool in the tool holder on the turret, see figures 1 & 2. The EZ-Puller needs to be within .004” of centerline.
2. Make sure the bar stock is supported inside the spindle with the properly sized spindle liner.
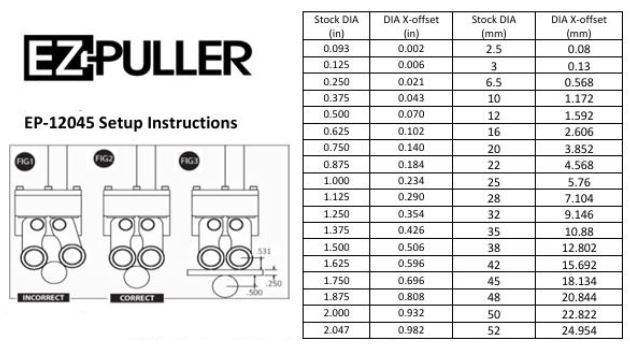
3. See figure 3 for an example of setting tool length offset. In figure 3 we are using a bar stock diameter of 1.000” and a .250” piece of flat stock for locating. Hand jog the X-axis until the flat stock slides between the bar stock and the
grippers with minimal friction. Add the radius of the stock, the thickness of the flat stock and radius of the grippers
(.531”); then multiply that number by 2. This is the distance from the centerline of the grippers to the centerline of
the spindle. Once the tool offset is entered, it will not need to be reset as long as the tool is not relocated.
4. Refer to table 1 for programming the destination in the X-axis for various bar sizes. Also see the example program on the back of this sheet locating.
5. ALWAYS prove out your program in front of the material before running your EZ-Puller.
6. NEVER run the spindle of your machine while setting up your EZ-Puller or when it is engaged with the material.
7. NEVER leave the tool engaged on the material for extended periods of time, as it will cause damage to the urethane
springs.
8. NEVER exceed the capacity of the tool.
PROGRAMMING INSTRUCTIONS
1. When writing the master program, this is the program that calls up the main program, make sure that your L count
calculation is correct. An incorrect L count can lead to bar ends being left in the grippers. If the bar end is not
removed from the grippers, you will experience a crash. It is recommended that you start off by leaving one less piece
in your L count until you are comfortable with the bar length and L count.
2. Bars should slide freely in the collet or chuck. When using a chuck, you will have the best results if the chuck opens
just enough for the bar to slide freely through the jaws.
3. Your EZ-Puller can leave marks on the outside diameter of the bar. The depth of the marks depends on the material
hardness and number of teeth engaged with the material. The more teeth that are engaged, the smaller the marks
will be. If the O.D. of the bar is a stock finish that will be unacceptable with large gripper marks it is recommended to
use a softer spring and engagement feed rate of 100 IPM. Accudyne Products sells three springs in 95A durometer
standard, 80A medium, and 70A light. Another option to try that has been successful is z engagement of the material,
using only three teeth or .140”, then chamfering, minimizing or facing off the marked region after the pull.